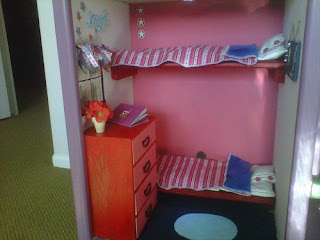
I took a little break from working on the kitchen and headed over to the bedroom. At last view, it was 3 brown walls without a ceiling and a possible purple outer trim!
I painted the back wall a vibrant pink, the two side walls a very soft, near white pink, the floor midnight blue and I created "prison beds" for the dolls. One thing I didn't take into account is that 18" dolls can't sleep in a 20" space with a 24" bed... Originally, I hoped to use the double bunk that you have likely seen online. Mom purchased the set and sent it out to us. I missed the measurement boat on that one and had to build 19" long beds. The girls don't mind because their dolls can sleep in their room and will visit their house during the day.
Making the beds-
I created the beds by cutting in half one of the original shelves for the entertainment center and I installed 4 pieces of 1x2x7 to serve as a rack for the halved shelf. I painted the beds red. The same color as the front door on the house.
I think Molly likes having the lower bed and has decided that since she is the much older American Girl Doll in the bedroom that Julie should get the top bunk that sleeps like a submarine sleeping quarters... let's just hope that Julie doesn't stir to easily in the night and hop out of bed too quickly or I'll be crocheting hats to cover the goose eggs.
 |
| Molly checking out her new crib... well prison bed |
 |
| The stick on lights were fast and quick! |
 Molly seems to like it in her new space!
 |
| The colors were a hit with Avery and Mallory... they say its get greater and greater every day! |
Curtains ...on a smaller scale...
I cut up 5 different pieces in 5-6" strips and double knotted them over the smallest dowel I could find. The dowel served as a curtain rod and I used eyebolts as the brackets. The Colors in the ribbon highlight the colors in the wall and will match the bedding that I made without being to cutsie.. |
| Have you seen the knotted ribbon valance? |
 |
| Here is what it looks like for an 18" person! |
The bedding!
Purchasing pre-made bedding from the AG store or on Etsy wasn't an option... unfortunately, they haven't made a Prison Charlie doll yet so everyone is sleeping in 3/4 beds with 6 additional inches of spaces above the head and toes.... Not our Julie and Molly. They only have a 19"x7" platform. I used the blog http://piecesforreese.blogspot.com and the awesome bedding she has created as a guide for these. The first step was creating the mattress.... well technically the first step was hem and hawing over what fabric, prints, texture, colors, etc... the second step was creating the mattress. Essentially, I serged two pieces of matching fabric together on 3 edges. I turned it right side out, put a little stuffing in it. Evened out the stuffing to avoid massive lumpies and sewed up the top by hand. After that, I went back and stitched notches to avoid having the stuffing move around. It took about 20 minutes total to create a mattress.
 |
| The first mattress is finished. It measures right at 19"x7"x.75 |
 |
| Artwork for walls can easily be created by small finds in the scrapbook & $1 section |
 |
| Check out the woodworking section for items to use! |


I have had a lot of fun looking at your dollhouse! So creative!
ReplyDeleteThis is such an adorable doll bedroom makeover!
ReplyDelete